Step by step instructions of how to install the DEVImat
- Installing the Devimat - Step 1: Measure the room you want to install the Devimat in and draw a sketch to help you calculate which DEVI package you will need. Then you can go ahead and sketch in the position of the devimat heating cable mat.
- Installing the Devimat - Step 2: Mark the positioning of the toilet before you remove it. This helps you avoiding the placing of the toilet on top of the mat and it also prevents you from piercing it with screws.
- Installing the Devimat - Step 3: Cut a channel approx. 10 mm deep and wide in the wall and the floor - all the way from the thermostat and about 1 m out into the floor. After you finishes that, glue the flex pipe for the sensor into this channel, and seal the end of the pipe with a piece of tape.
- Installing the Devimat - Step 4: Clean the floor thoroughly, removing all dirt and soap residue, and then lay out the self-adhesive cable mat. Remember: the floor surface must be primed if you are not laying the mat on existing tiles.
- Installing the Devimat - Step 5: Clip through the grey netting to turn the mat over - at the same time make sure that you do not cut through the red cable!
- Installing the Devimat - Step 6: Turn the mat and position it as required. The self-adhesive effect can withstand 10-20 adjustments, so you can move the mat several times until you are satisfied with the result. Adjust the position of the mat according to how you think it should be fixed on the floor.
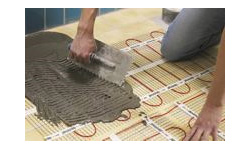
 Installing the Devimat - Step 7
Once you have positioned the cable mat, you can - depending on the new floor surface - encapsulate it using self-levelling screed or cover it with a thin layer of tile adhesive.
Remember: you can find these instructions both in the leaflet that you get in store when you come to visit us and on the DEVI website. To purchase Devimat electric underfloor heating systems, choose the floor type - Devimat for Wooden Floors, Devimat for Concrete Floors, or Devimat for Laminate Floors.


